
So I did a xen install on a dell PE R220 and then tried to do a simple Debian install from a cd. In the first instance it took about 10 minutes for the initial Debian splash screen then when it couldn’t connect to an apt mirror it froze, I tried shutting down the vm via XenCenter and it just got stuck and wouldn’t shutdown properly. I tied an external cd drive and had the same problems. After some cursing I dug out one of my trusty ML115 G5’s that was waiting patiently on a shelf. Installed Xen and Debian via CD with no issues at all!.
Finding CPU temperature on Raspberry Pi
Here are a few ways to find out your cpu temperature on a pi running raspian.
/opt/vc/bin/vcgencmd measure_temp temp=49.8'C
cat /sys/class/thermal/thermal_zone0/temp 49768
cat /sys/devices/virtual/thermal/thermal_zone0/temp 49768
perl -e 'm/(d+)/; $x=$1; s/d+//; printf ("%.1f", ( $x / 1000))' -p /sys/class/thermal/thermal_zone0/temp 49.8
gawk '{print $1/1000,"degrees C"}' /sys/class/thermal/thermal_zone0/temp 49.768 degrees C
Cineworld Ipswich Subtitles Fail
On the rare occasion I feel like venturing to the cinema (last film I saw was ‘The Fighter’) generally subtitled showings are at some ridiculous hour of the night. Today I thought I would see what is on, the entire choice was Inside Out Rated U Paper Towns Rated 12A Pixels Rated 12A I looked at other Cineworld venues and although marginally better choice single showings were only available on weekdays during the afternoon. So from what I can work out Cineworld have done some sort of profiling at come to the conclusion that deaf people are either nocturnal and only venture out after 10pm and don’t have jobs and that we are all aged under 12 OR we can only handle children’s films and that we require adult supervision. I’ve looked into this and apparently subtitles at the cinema can be switched on and off just like you would with a DVD so why are we treated as outcasts?
My Location Hearing Dogs The Grange
HP27 9NU, United Kingdom N 51°41’03.58″, W 0°49’48.28″ http://maps.google.com/maps?q=loc:51.68433%2C-00.83008
My Location Camber Sands
7, The Suttons N 50°55’52.55″, E 0°48’13.97″ http://maps.google.com/maps?q=loc:50.93126%2C00.80388
My Location Hearing Dogs The Grange
12, Wycombe Rd N 51°41’04.40″, W 0°49’47.35″ http://maps.google.com/maps?q=loc:51.68456%2C-00.82982
Hearing Dog Update
Just had some awesome news from the people at Hearing Dogs, they have found a potential match for me and would like me to visit them so we can meet and see how we get on. He’s a 19 month old black Labrador.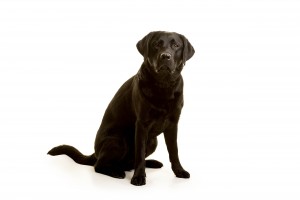
My Location
IP13 0QN, United Kingdom N 52°9’47.57″, E 1°23’02.42″ http://maps.google.com/maps?q=loc:52.16321%2C01.38401
Grive sync API now defunct
I noticed my files were no longer being sync’d using the grive application. Further investigation revealed the following errors. ./grive Reading local directories Synchronizing folders exception: /usr/bin/grive/libgrive/src/protocol/AuthAgent.cc(174): Throw in function long int gr::AuthAgent::CheckHttpResponse(long int, const string&, const gr::http::Header&) Dynamic exception type: boost::exception_detail::clone_impl
Draytek ARP address mismatch
I’ve previously had an issue with clients not being able to connect and ARP address mismatch showing in the logs.This happens when the source mac address doesn’t match ARP senders mac address. This was resolved by accessing the Draytek via telnet and executing.
ip arp accept 1
Which will return
Accept illegal ARP source mac REPLY packets